StarCraft 2 API from scratch
If you google something like "starcrfat 2 api bot" you definitelly will found some cool tutorials of how to create own bot
Personaly for me this one was a starting point into subject
I did managed to beat medium computer by terran marine maraudeur three barracks push with help op python-sc2
But as usual whenever it comes to a pythong it is like a seven rounds of hell with its duck typing
So my curiosity land me into trying to figure out how to utilize raw api in a first place with something strongly typed
Under the cover StarCraft exposes protobut api which is documented here
In followup examples I'm saving some notes of raw usage (without any fancy stuff, libraries, wrappers, etc) for it to become really clear how to get up and running
Starting StarCraft
Most of implementations are managing this aspect, there a different modes of how StartCraft may be started but at very minimum it requires to pass few flags to expose api
Also there is an important note of from where (working directory) StarCraft is launched, otherwise you will get Required library 'icuuc52.dll' does not exist
So, here is how StartCraft should be started:
cd "D:\Battlenet\StarCraft II\Support"
"D:\Battlenet\StarCraft II\Versions\Base86383\SC2.exe" -listen 127.0.0.1 -port 8168 -displaymode 0 -windowwidth 1024 -windowheight 768 -windowx 0 -windowy 0
Notes:
- In my case StartCraft installed in non default path
- You need to use Support as a working directory to deal with icuu
- Minimal flags are
-listenand-port, all other are self explanatory - If everything fine, black screen with StarCraft cursor will appear - it is ok, and means that we did everything correct
StarCraft Protobuf
Protobuf definitions can be found here just drop them to s2clientprotocol in the root of your project so C# will see them.
Now install few dependencies:
dotnet add package Grpc.Net.Client
dotnet add package Google.Protobuf
dotnet add package Grpc.Tools
And in your csproj file add:
<ItemGroup>
    <Protobuf Include="s2clientprotocol/*.proto" GrpcServices="Client" />
</ItemGroup>
After compiling project in obj/Debug/net6.0/s2clientprotocol you should see bunch of auto generated classes representing protocol
At the very end whole protocol is just about sending Request as an input and receiving Response as an output via web socket conntection
WebSockets
WebSockets are used to transit bytes to/from StarCraft
In my case I'm going to use dotnet, and here are some boiler plate examples:
var ws = new ClientWebSocket();
ws.ConnectAsync(new Uri("ws://127.0.0.1:8168/sc2api"), CancellationToken.None).Wait();
Console.WriteLine("Connected");
We are expecting StartCraft to be started already (here you may wish to automate this and start it programmantically) but leaved such by intent to be as little as possible
Sending message:
var req = new Request { Ping = new RequestPing() };
await ws.SendAsync(req.ToByteArray(), WebSocketMessageType.Binary, true, CancellationToken.None);
Receiving response:
await using var ms = new MemoryStream();
while(true)
{
    var buffer = new ArraySegment<byte>(new byte[1024*1024]);
    var result = await ws.ReceiveAsync(buffer, CancellationToken.None);
    if (buffer.Array != null)
    {
        ms.Write(buffer.Array, 0, result.Count);
    }
    if (result.EndOfMessage)
    {
        break;
    }
}
ms.Seek(0, SeekOrigin.Begin);
var res = Response.Parser.ParseFrom(ms);

Console.WriteLine(res);
{ "ping": { "gameVersion": "5.0.8.86383", "dataVersion": "22EAC562CD0C6A31FB2C2C21E3AA3680", "dataBuild": 86383, "baseBuild
": 86383 }, "id": 0, "status": "launched" }I did lied to myself, will need at least some kind of wrapper for further examples:
public class Client
{
    private readonly ClientWebSocket _clientWebSocket;

    public Client(ClientWebSocket clientWebSocket)
    {
        _clientWebSocket = clientWebSocket;
    }

    public async Task SendAsync(Request req) {
        await _clientWebSocket.SendAsync(req.ToByteArray(), WebSocketMessageType.Binary, true, CancellationToken.None);
    }

    public async Task<Response> ReceiveAsync()
    {
        await using var ms = new MemoryStream();
        while(true)
        {
            var buffer = new ArraySegment<byte>(new byte[1024*1024]);
            var result = await _clientWebSocket.ReceiveAsync(buffer, CancellationToken.None);
            if (buffer.Array != null)
            {
                ms.Write(buffer.Array, 0, result.Count);
            }
            if (result.EndOfMessage)
            {
                break;
            }
        }
        ms.Seek(0, SeekOrigin.Begin);
        return Response.Parser.ParseFrom(ms);
    }
}
Starting game
Steps are described in sc2api.proto
Create game
await client.SendAsync(new Request
{
    CreateGame = new RequestCreateGame
    {
        Realtime = true,
        LocalMap = new LocalMap
        {
            MapPath = "D:/Battlenet/StarCraft II/Maps/Flat64.SC2Map"
        },
        PlayerSetup =
        {
            new PlayerSetup
            {
                Type = PlayerType.Participant
            },
            new PlayerSetup
            {
                Race = Race.Terran,
                Type = PlayerType.Computer,
                Difficulty = Difficulty.Medium
            }
        }
    }
});
Console.WriteLine(await client.ReceiveAsync());
// { "createGame": { }, "id": 0, "status": "init_game" }
Join game
await client.SendAsync(new Request
{
    JoinGame = new RequestJoinGame
    {
        Race = Race.Zerg,
        Options = new InterfaceOptions
        {
            Raw = true,
            Score = true
        }
    }
});
Console.WriteLine(await client.ReceiveAsync());
// { "joinGame": { "playerId": 1 }, "id": 0, "status": "in_game" }
In twenty seconds leave the game
Thread.Sleep(20000);
await client.SendAsync(new Request { LeaveGame = new RequestLeaveGame() });
Notes:
- because we are not quit we can rerun program as many times as we want without restarting game itself
- in case of error response will contain correspongind error enum and error details description
Before starting main loop we may want to receive game info:
await client.SendAsync(new Request { GameInfo = new RequestGameInfo() });
Console.WriteLine(await client.ReceiveAsync());
Which will contain some basic information about map, players, starting positions etc
TODO: how to decode data
Then we may want to retrieve "data"
await client.SendAsync(new Request { Data = new RequestData
{
    UnitTypeId = true
} });
Console.WriteLine(await client.ReceiveAsync());
You can pass much more flags to it, in returned response there will be dictionary for a unit types, e.g. for a Zerg worker:
{
  "unitId": 104,
  "name": "Drone",
  "available": true,
  "cargoSize": 1,
  "attributes": ["Light", "Biological"],
  "movementSpeed": 2.8125,
  "armor": 0,
  "weapons": [
    {
      "type": "Ground",
      "damage": 5,
      "attacks": 1,
      "range": 0.100097656,
      "speed": 1.5
    }
  ],
  "mineralCost": 50,
  "vespeneCost": 0,
  "foodRequired": 1,
  "abilityId": 1342,
  "race": "Zerg",
  "buildTime": 272,
  "sightRange": 8
}
Also in protobuf repository three is stableid.json with [ 'Abilities', 'Buffs', 'Effects', 'Units', 'Upgrades' ] keys and inside there the same drone will be { id: 104, name: 'Drone' } - it should be used as a part of code generation step, note that actual game data contains way more info which might be changed depending on concrete map
Main loop
Now when we started a game and grab all required info in a loop we are going to:
Observing game state
await client.SendAsync(new Request { Observation = new RequestObservation() });
Console.WriteLine(await client.ReceiveAsync());
This one will return huge structure with game state data, thats from where all libraries are aquiring all objects
Sending actions
Lets send first found worker attack somewhere
var firstUnit = observation.Observation.Observation.RawData.Units.FirstOrDefault(u => u.UnitType == 104);
Console.WriteLine(firstUnit);
var action1 = new Action
{
    ActionRaw = new ActionRaw
    {
        UnitCommand = new ActionRawUnitCommand
        {
            AbilityId = 23, // Attack
            TargetWorldSpacePos = new Point2D
            {
                X = 40.0f,
                Y = 40.0f
            },
            UnitTags = { firstUnit.Tag }
        }
    }
};
await client.SendAsync(new Request { Action = new RequestAction { Actions = { action1 } } });
Console.WriteLine(await client.ReceiveAsync());
// { "action": { "result": [ "Success" ] }, "id": 0, "status": "in_game" }
Note: that you can send more than one action per loop
At the very end most of existing libraries are set of helpers and utilities around all this
Few more notes
Image data
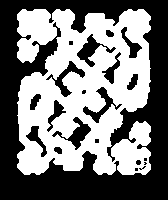
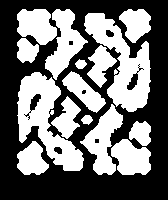
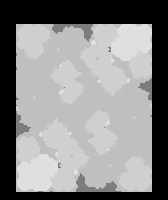
In game infor there is an image data for placement grid (where building can be build), path findings (where units can travel), terrain height
All three are just bytes arrays which might be converted to images like so:
// works for PlacementGrid and PathingGrid
var placementGridImage = new Bitmap(gameInfo.GameInfo.StartRaw.PlacementGrid.Size.X, gameInfo.GameInfo.StartRaw.PlacementGrid.Size.Y);
for (var y = 0; y < gameInfo.GameInfo.StartRaw.PlacementGrid.Size.Y; y++)
{
    for (var x = 0; x < gameInfo.GameInfo.StartRaw.PlacementGrid.Size.X; x++)
    {
        var index = x + y * gameInfo.GameInfo.StartRaw.PlacementGrid.Size.X;
        var b = gameInfo.GameInfo.StartRaw.PlacementGrid.Data[index/8];
        var p = 7 - index % 8;
        var mask = 1 << p;
        var val = (b & mask) != 0;
        placementGridImage.SetPixel(x, y, System.Drawing.Color.FromArgb(val ? 255 : 0, val ? 255 : 0, val ? 255 : 0));
    }
}
placementGridImage.Save(@"C:\Users\mac\OneDrive\Desktop\PlacementGrid.bmp");

var terrainHeightImage = new Bitmap(gameInfo.GameInfo.StartRaw.TerrainHeight.Size.X, gameInfo.GameInfo.StartRaw.PathingGrid.Size.Y);
for (var y = 0; y < gameInfo.GameInfo.StartRaw.TerrainHeight.Size.Y; y++)
{
    for (var x = 0; x < gameInfo.GameInfo.StartRaw.TerrainHeight.Size.X; x++)
    {
        var index = x + ((gameInfo.GameInfo.StartRaw.TerrainHeight.Size.Y - 1) - y) * gameInfo.GameInfo.StartRaw.TerrainHeight.Size.X;
        var encodedHeight = gameInfo.GameInfo.StartRaw.TerrainHeight.Data[index];
        // var decodedHeight = -100.0f + 200.0f * encodedHeight / 255.0f;
        terrainHeightImage.SetPixel(x, y, System.Drawing.Color.FromArgb(encodedHeight, encodedHeight, encodedHeight));
    }
}
terrainHeightImage.Save(@"C:\Users\mac\OneDrive\Desktop\TerrainHeight.bmp");
Which will give us:
Also, while observing there is two more image data - one for visibility map and second for creep
Debug commands
Here an example of few debug commands which will allow us to control the game (aka recreate some situation)
await client.SendAsync(new Request { Debug = new RequestDebug { Debug =
{
    // disable fog of war (now observation will show us all units on the map)
    new DebugCommand { GameState = DebugGameState.ShowMap },
    // will allow us to send commands to any unit on the map
    new DebugCommand { GameState = DebugGameState.ControlEnemy },
    // create 40 worker
    new DebugCommand { CreateUnit = new DebugCreateUnit { Owner = 1, UnitType = 104, Quantity = 40, Pos = new Point2D { X = 40.0f, Y = 40.0f}} }
}} });
Console.WriteLine(await client.ReceiveAsync());
Displaying debug info
There are thre ways to have debug info right in the game
Send a chat message
await client.SendAsync(new Request { Action = new RequestAction { Actions = { new Action { ActionChat = new ActionChat { Channel = ActionChat.Types.Channel.Broadcast, Message = "Hello" } } } } });
Console.WriteLine(await client.ReceiveAsync());
// { "action": { "result": [ "Success" ] }, "id": 0, "status": "in_game" }
Draw a text on screen
await client.SendAsync(new Request
{
    Debug = new RequestDebug
    {
        Debug =
        {
            new DebugCommand
            {
                Draw = new DebugDraw
                {
                    Text =
                    {
                        new DebugText
                        {
                            Text = "Hello"
                        },
                        new DebugText
                        {
                            Color = new Color {R = 255, G = 0, B = 0},
                            Size = 24, // 8 default
                            VirtualPos = new Point { X = 0.5f, Y = 0.5f },
                            Text = "Hello World"
                        }
                    }
                }
            }
        }
    }
});
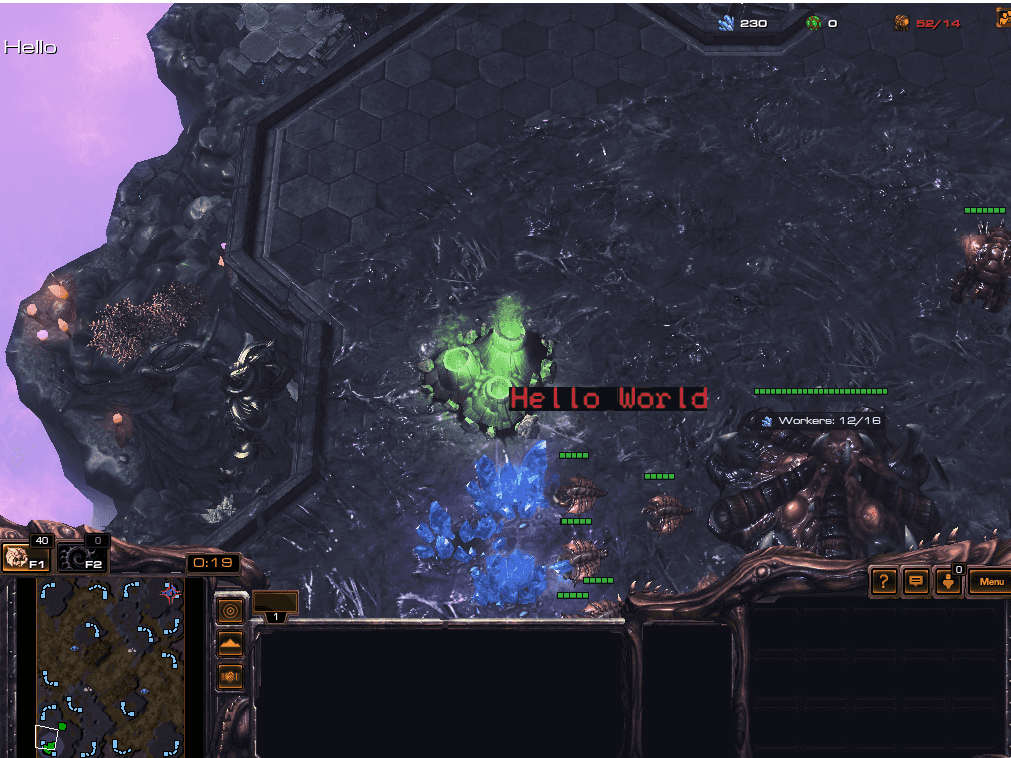
Note: text is persisten and will be overwriten on a next call
Draw some lines and boxes
await client.SendAsync(new Request
{
    Debug = new RequestDebug
    {
        Debug =
        {
            new DebugCommand
            {
                Draw = new DebugDraw
                {
                    Lines =
                    {
                        new DebugLine
                        {
                            Color = new Color { R = 255, G = 0, B = 0 },
                            Line = new Line
                            {
                                P0 = new Point { X = 0, Y = 0, Z = 20 },
                                P1 = new Point { X = 255, Y = 255, Z = 20 }
                            }
                        }
                    },
                    Boxes =
                    {
                        new DebugBox
                        {
                            Color = new Color { R = 255, G = 0, B = 0 },
                            Min = new Point { X = 24.0f, Y = 24.0f, Z = 10.0f },
                            Max = new Point { X = 28.0f, Y = 28.0f, Z = 16.0f },
                        }
                    }
                }
            }
        }
    }
});
Same story as with text, drawings wont dissapear until next drawn
Points are calculating from left bottom corner, and should be in range of map size, e.g. if we are on map with size 168 and 200 then points must be within this numbers
It was fun holidays, there is so much to discover, need to save it somewhere in repo